Introduction
Images can quickly take up a lot of storage space and make up a huge difference in bandwidth usage when involved in mass mailing campaigns.
In some cases we've actually seen huge images bring servers down by snowball effect, mostly because connections have to be maintained for much longer to transfer the image data stream to each client which can severely affect some server software that possibly wasn't meant to stream high quantities of binary data.
Systematic image minification also has the advantage of removing all of the EXIF and similar text metadata from images. That data is almost always unwanted for web usage and can divulge unwanted information about locations, among other things.
Here's a rundown of a few techniques to minify your images without losing too much in the process.
Manual optimisation
Let's start from the basics. Image minification makes use of various independent tools. You could very well use these independently yourself.
For instance, I tend to manually minify most of my PNG files but leave the JPG as they are unless said JPGs are really big.
Sometimes you just don't want to minify everything and minifications techniques are not equal in how they might affect the quality.
Quick important note: all these tools are meant for the command line but will work on Windows, Mac and Linux.
PNG
We like to use pngquant.
The program accepts a parameter to set the target quality treshold.
The good news is you don't really have to fiddle with it too much because the default (that is, not providing that quality parameter) produces pretty good results.
The easiest way to produce a minified version of a given image would be to use a command such as:
pngquant <SOURCE>.png -o <DESTINATION>.pngYou can then check the result for yourself rather than taking my word for it but at some point I just started trusting the default setting.
Here's a quick comparison of the original and compressed versions, original first with size 424 Kb:

And the compressed version with size 184 Kb:

There is a difference in quality but it's barely perceptible and this is a rather big picture with significant color depth.
The pngquant command has also removed any EXIF and related data (although the PNG "comment" field is still there).
Minify all the images in a folder
There is a way to quickly replace all PNG files in a directory with their minified version.
You should probably make a copy of the original files before doing so, because even if PNG is lossless by default, pngquant might decide to remove some colors from the image as part of the minification process, ultimately resulting in lossy compression.
Now that you've been warned, here's how you'd do it from inside the target directory:
pngquant -f --ext .png *.pngJPEG
The venerable JPEG image format based on lossy compression algorithms can still achieve very good results on images with slow contrast changes (large photographs are a good use case).
Our program of choice for JPEG optimization is jpegoptim.
It's present in a form or another on Linux package managers and you should be able to find a Windows installer after a quick search.
On Mac OS it can be installed with Homebrew.
Contrary to how pngquant worked, jpegoptim compresses in place by default so you might want to make a backup of the images beforehand.
The basic minification command is as follows:
jpegoptim -m90 -s <SOURCE_FILE>.jpgYou can lower the "-m" parameter value to increase compression but you'll lose more quality in the process. The "-s" option ensures we strip all the EXIF and related data, jpegoptim doesn't do it by default.
Quick comparison again with a photograph, original first with size 684 Kb:

And the compressed version with size 370 Kb:

SVG
SVG is a vector graphics format using XML text data.
Compressing a SVG usually involves removing XML nodes. Comments and useless attributes come to mind but you can also simplify complex paths so that the amount of nodes they're made of decreases, and some attributes can removed by using global styles or equivalent.
If you're using SVGs at all you probably already know how to export an "optimized" version of them from your authoring software such as Inkscape or Adobe Illustrator.
Getting a well optimized SVG from one of these software is already pretty good as far as minification goes. You could also manually try to simplify paths using in-software options.
All of that being said, a good command line SVG minification tool is SVGO. It's written in JavaScript and requires NodeJS.
With NodeJS installed, you can use npm to install SVGO globally (run as administrator):
npm install -g svgoUsing it is simple:
svgo <SOURCE>.svg -o <DESTINATION>.svgHere's an example on a schematic that has already been optimized out of Inkscape, and we're still getting a significant reduction (6.6 Kb to 4.7 Kb):

Compressed version:

It's probably a good idea to apply such minification to any custom icon or sprite sheet before publishing them.
GIF
The use cases for GIFs are dwindling although they're still very much in use for animations, even though webp and SVGs may fill that role in the future.
There's a great general use GIF tool that can do minification called Gifsicle.
As always, it's present in package managers for Linux, Homebrew for Mac and there are Windows binaries too.
The most basic command is as follows:
gifsicle -i <SOURCE>.gif -O3 -o <DESTINATION>.gifWe're not showing an example here, the gain on heavy animations is minor but you might want to run it on any gif icon you're still using.
If you wanted to go further, there are options to manually restrict the color range or resize the image with gifsicle.
To minify in place (that is, replace the source file immediately) you just remove the "-o" option and add "-b".
The WebP format
WebP is a newer image format featuring an alpha channel and using modern compression algorithms with options for both lossy or lossless compression.
It's usually used in lossy mode as a good replacement for JPEG as it achieves better compression with a very minor loss in quality.
However, WebP is currently not supported by Safari (including Safari mobile) and Internet Explorer 11, which effectively prevents its use as a full-on replacement for JPEG.
When you want to make use of the WebP format on the web, you have to provide an alternative format, which usually involves the HTML5 picture tag.
Deciding to use WebP is not a manual optimization. You will want an automatic build system that produces a WebP counterpart to images with a predictable filename.
In your HTML you will need a considerably more complex progressive enhancement image code:
<picture>
  <source srcset="source.webp" type="image/webp">
  <source srcset="source.jpg" type="image/jpeg">
  <img src="source.jpg">
</picture>
The first source tag has to be the WebP image. In case it's not supported by the browser, it'll fall back to the second source tag.
Browsers with no support for the picture tag (which is pretty much only Internet Explorer 11) will still parse and use the img tag, thus enabling full spectrum support.
For more information about WebP, please visit this great CSS tricks article.
Automatic minification
Here are a few leads you can follow to make the whole process more automatic.
The imagemin project
There is a well known NodeJS project grouping all the minification tasks (including WebP conversion) in one convenient package: imagemin.
Normally meant to be used from .js scripts, there is a CLI version too that you could use to replace all the manual command line tools described previously in this article.
You can create a quick batch script with no task runner or module bundler required as follows:
- Go to your project directory
- Initialize a package.json file if there isn't one yet using npm init
- Install imagemin: npm install -D imagemin
- Create a .js file at the root of the project (let's call it process-images.js)
In the .js file we'll add all the minification we introduced above in light of manual optimization.
The script will copy images from "assets/images" to a "dist/images" folder that we have as a variable at the beginning of the file.
We first have to manually install all of the plugins we're going to use (you could install these things globally instead):
npm install -D imagemin-jpegoptim imagemin-pngquant imagemin-gifsicle imagemin-svgoAnd here's the script:
const imagemin = require('imagemin');
const imageminJpegoptim = require('imagemin-jpegoptim');
const imageminPngquant = require('imagemin-pngquant');
const imageminGifsicle = require('imagemin-gifsicle');
const imageminSvgo = require('imagemin-svgo');

// Source is an array, you can add multiple folders.
const source = [
  'assets/*.{jpg,png,gif,svg}'
];
const destination = 'dist/images';

(async () => {
  const files = await imagemin(source, {
    destination: destination,
    plugins: [
      imageminJpegoptim({ max: 90 }),
      imageminPngquant(),
      imageminGifsicle({ optimizationLevel: 3 }),
      imageminSvgo({ removeViewBox: false })
    ]
  });

  if (!files.length) console.log('Nothing found in source directories');
  else files.forEach(f => console.log(`Processed ${f.sourcePath}`));
})();
Run it using node process-images.js — It will overwrite any file that possibly already exists in the destination folder and create the directory if not present.
Using module bundlers
As you might image all module bundlers have a way to integrate image minification.
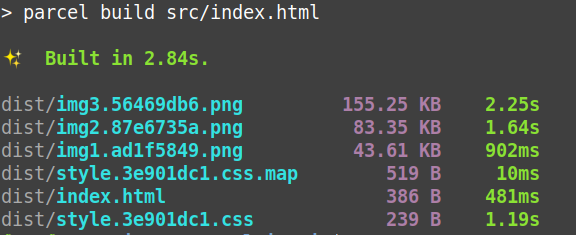
As an illustration let's see how you do it with ParcelJS (picked that one because it's really easy).
In any project using parcel you just install the following plugin:
npm install -D parcel-plugin-imageminAnd that's it. It will automatically minimize anything picked up by Parcel as a resource. You can check what it picked up on the command line output:
For Webpack you will want to have a look at the image-webpack-loader.
Conclusion
On top of reducing your bandwidth and disk space usage, image minification can make your site or email campaign feel more reactive overall.
We have not delved into modern solutions involving downloading a blurred minimal version of images first (usually it's inlined in the HTML or JS directly) and then downloading the full image using JavaScript but that's probably where the future will be, combined with general image minification techniques.
That technique is basically what Gatsby does for you with the gatsby-image component.