Introduction
We previously introduced Podman, a container engine and toolkit that can serve as an alternative to Docker.
The engineers from Redhat seemingly wanted to bridge the worlds of Kubernetes with traditional workstation containers. One of these aspects meant supporting the concept of pods which, after all, is in the name of the project itself.
What is a pod for Podman
The shortest and most effective way to explain pods is to discribe them as a group of container that share the same "local" network.
Let's consider a pod comprised of a PHP container and a MySQL database container. We'll want to expose some kind of HTTP or PHP-FPM port but we don't need to expose the MySQL port, because the PHP container will have access to it automatically on 127.0.0.1/localhost because they're part of the same pod.
This means less port bindings on your hosts and not having to actually expose everything.
How pods work with Podman does differ from Kubernetes as we can see more of the lower-level mechanics poke through.
For one thing, you'll see every internal container from any pod will show podman ps listings.
Second, a pod will always have at least 1 container called the "infra" container.
The container itself doesn't do anything, it's a process that yields the CPU immediately when scheduled. However, it's holding all the host configuration we need for the pod.
For instance, the infra container is the one and only one that will be binding ports we'll want to expose from the pod.
A consequence of this will be that we can't change port bindings once a pod has been created, just like you can't change port bindings on a single container without running it again from scratch in the Docker or Podman worlds.
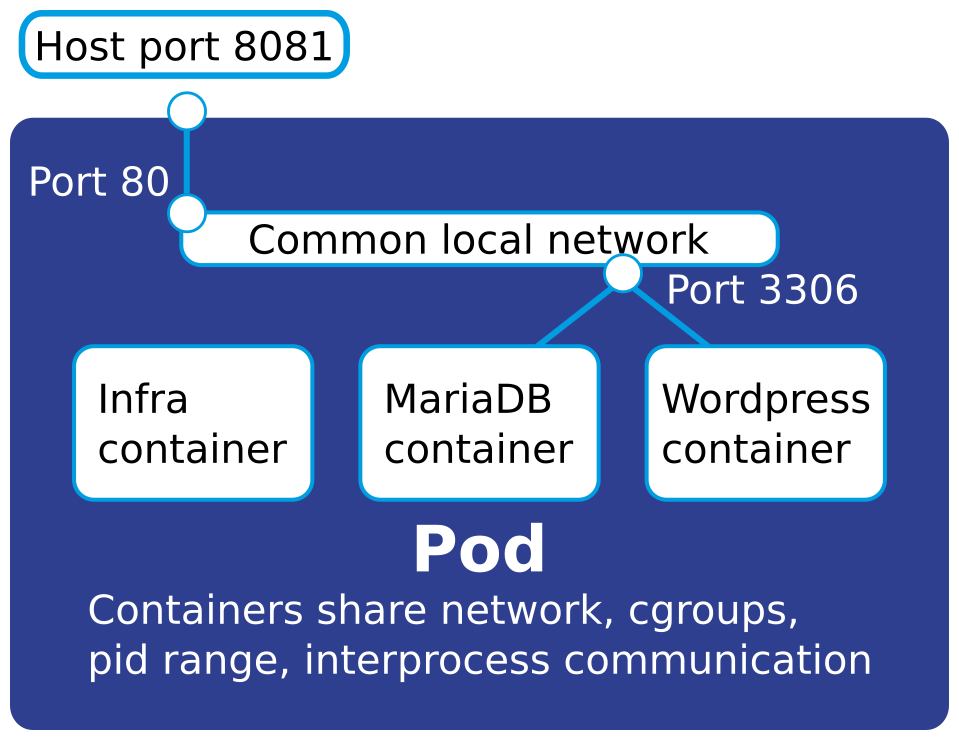
Here's a schematic of an example pod running Wordpress we'll deploy later on in this article:
Creating and managing pods
The Podman CLI tool has a subset of commands accessible from using podman pod [subcommand]
We'll see later that we can also use a Kubernetes yaml file with either Pod or Deployment resources but that's a more advanced use of Podman pods.
As a quick note for the future, Podman is still a young project and there's apparently some kind of equivalent to docker-compose though we can't guarantee it'll get released one day.
The normal workflow is as such:
- Use podman pod create to initialize the new pod, ideally also giving it a name and setting up the port bindings you'll need;
- Use podman run commands with a specific --pod argument to assign containers to the pod;
- We can then use podman pod start or stop to control the pod itself;
- A stopped pod can be deleted using podman pod rm.
In practice
It's much better to show how it works with a simple example that most of us are familiar with: creating a single-pod Wordpress installation.
The example requires 2 containers, as there is a Wordpress official image that holds the required Apache + PHP. The second container would be a MySQL-compatible database for Wordpress to use.
Let's create the pod first:
podman pod create --name wordpress-test -p 8081:80Where we make sure to give it a name and prepare all the port bindings we'll need. I'm choosing to access the Wordpress install on port 8081 of my host, which will bind to port 80 on the pod itself.
Let's add the database container to the pod:
podman run -d --pod=wordpress-test \
  -e MYSQL_ROOT_PASSWORD="geheim" \
  -e MYSQL_DATABASE="wp" \
  -e MYSQL_USER="wordpress" \
  -e MYSQL_PASSWORD="w0rdpr3ss" \
  --name=wordpress-test-db mariadb
Notice the --pod=<POD_NAME> argument which is what assigns the container to that pod.
It's a good practice to pick container names that have the name of the pod in them or mention they're part of a pod, as listing podman containers will also list the ones that are part of pods.
The environment variables will configure the database server (MariaDB) with a user and initial database name we can provide to the Wordpress container.
Speaking of which, let's deploy it:
podman run -d  --pod=wordpress-test \
  -e WORDPRESS_DB_NAME="wp" \
  -e WORDPRESS_DB_USER="wordpress" \
  -e WORDPRESS_DB_PASSWORD="w0rdpr3ss" \
  -e WORDPRESS_DB_HOST="127.0.0.1" \
  --name wordpress-test-web wordpress
Where we specify the database host to be on 127.0.0.1 to leverage the pod network.
The Wordpress pod should now be working:
$ podman pod ps
POD ID        NAME            STATUS   CREATED        INFRA ID      # OF CONTAINERS
f5acf9ada36c  wordpress-test  Running  3 minutes ago  0ca91e2ff1be  3
It shows the pod as running with 3 containers (the infra container and our two containers used for Wordpress).
If you query the running containers, you'll see the 3 components of the pod and notice that the infra container is using an image called "pause":
$ podman ps
CONTAINER ID  IMAGE                               COMMAND               CREATED      STATUS          PORTS                 NAMES
0ca91e2ff1be  k8s.gcr.io/pause:3.2                                      3 minutes ago  Up 3 minutes ago  0.0.0.0:8081->80/tcp  f5acf9ada36c-infra
110341f3ae18  docker.io/library/mariadb:latest    mariadbd              3 minutes ago  Up 3 minutes ago  0.0.0.0:8081->80/tcp  wordpress-test-db
96b3c06b4469  docker.io/library/wordpress:latest  apache2-foregroun...  3 minutes ago  Up 3 minutes ago  0.0.0.0:8081->80/tcp  wordpress-test-web
Running the pod at system start
At the time of writing this article there doesn't seem to be an easy way to run a pod as a non-root user and have it start at boot.
If you really need it to start with the computer it's better to use root pods for the moment (like you'd do with Docker).
To do so we'd have to run the commands in the previous sections as root (or with sudo).
Once you got your pod running as intended, it's best to have podman generate the required service files:
podman generate systemd wordpress-test -t 5 -n --restart-policy=always --filesWhere wordpress-test is the name of the pod we created.
The utility should have created 3 files in the current directory, and we need all of these services to operate the pod (1 per container + 1 for the infra container):
$ ls -lh
total 12K
-rw-r--r-- 1 root root 769 Dec 14 16:07 container-wordpress-test-db.service
-rw-r--r-- 1 root root 774 Dec 14 16:07 container-wordpress-test-web.service
-rw-r--r-- 1 root root 848 Dec 14 16:07 pod-wordpress-test.service
The file names are very important because the services reference each others.
Simply copy or move the files to /etc/systemd/system/, then you should be able to start and stop the pod by interacting with the "main" service for it, which is named pod-wordpress-test.service in our case:
systemctl start pod-wordpress-test.serviceTo make it run when the computer starts, we just have to enable the main service like so:
systemctl enable pod-wordpress-test.serviceCreating the pod using Kubernetes resources
It's possible to use Kubernetes yaml files with Podman though it currently only supports Pod and Deployment objects.
If you want to use a yaml files that contains other resources (e.g. Services) you have to manually remove them beforehand.
For port bindings, you have to add hostPort values to container specs, as we'll show in an example below for a single-pod Wordpress deployment on port 8081 on the host (we tried to have the same setup we did manually earlier):
apiVersion: apps/v1
kind: Deployment
metadata:
  name: wordpress-test
  labels:
    app: wordpress-test
spec:
  selector:
    matchLabels:
      app: wordpress-test
  template:
    metadata:
      labels:
        app: wordpress-test
    spec:
      containers:
      - image: mariadb:latest
        name: db
        env:
        - name: MYSQL_ROOT_PASSWORD
          value: "geheim"
        - name: MYSQL_DATABASE
          value: "wp"
        - name: MYSQL_USER
          value: "wordpress"
        - name: MYSQL_PASSWORD
          value: "w0rdpr3ss"
        ports:
        - containerPort: 3306
          name: db
      - image: wordpress:latest
        name: web
        env:
        - name: WORDPRESS_DB_NAME
          value: "wp"
        - name: WORDPRESS_DB_USER
          value: "wordpress"
        - name: WORDPRESS_DB_PASSWORD
          value: "w0rdpr3ss"
        - name: WORDPRESS_DB_HOST
          value: "127.0.0.1"
        ports:
        - containerPort: 80
          hostPort: 8081
          name: web
This will have the same result as our earlier Wordpress deployment when you provide the yaml file with the play kube option:
podman play kube wordpress-deploy.yaml$ podman pod ps
POD ID NAME STATUS CREATED INFRA ID # OF CONTAINERS
2bccc6b23acc wordpress-test-pod-0 Running 15 seconds ago e9dbaea1577b 3
Using Kubernetes resources is a good alternative to docker-compose.
Just keep in mind you can't update a running deployment like you would on an actual Kubernetes cluster, you still have to destroy the old pod first (stop it then use podman pod rm) before changing the host port binding.
Final words
Podman is still a young project evolving fast, but it's got all of the tooling you'd need to replace Docker, and more, as we've seen today with pods.