Introduction
This article is mostly about how to setup your VPN access to the Net7 networks to access your services with limited firewall restrictions.
We will update the content accordingly to software updates and are open to feedback in the comments below.
What is the VPN for?
We enforce mandatory firewalling in front of every service we host here at Net7.
The default policy is to make nothing reachable from the outside except for what we specifically allow.
If you want to connect to your server using SSH or to your database using a local database client, you need a VPN connection to do so.
To point of the VPN is basically to make it as if you were on the private network on which your remote services are running so that you can connect to your services with no firewall restrictions as shown in the figure below.

The IP address on which your services will be made available on the VPN should have been communicated to you with the rest of your access credentials.
Is there another way?
For people unable to use the VPN for various reasons (one of them is having a whole team of people in need of VPN accesses at the same time), the easiest solution is to manually allow the IP address of their offices to access the required services directly from its public IP address.
For folks with no fixed IP addresses of their own we can still come up with a personalized solution if absolutely needed. For instance, we have a few private IPsec tunnels for select customers.
Provided VPN types
The most flexible is the OpenVPN tunnel. If in doubt, always use that one.
Please note that the VPNs are supposed to be used only for the traffic related to the Net7 internal networks, your general internet traffic won't go through the VPN by default.
OpenVPN
Our OpenVPN service runs on TCP port 443, which means it should even work in a captive wifi environment and in most heavily firewalled offices.
It's the most compatible over the board and only good option for the VPN on a mobile phone or tablet.
You access credentials for OpenVPN consists of a zip file that was sent to you during the setup of your service.
Keep the zip or the underlying files in a safe place as the .key file inside is the equivalent of a password. As with an actual password, we'll never ask you for it, be it by email or whatever. So if someone is asking you to send them your OpenVPN files, something is definitely fishy and you should not do it.
If you think an OpenVPN access has been compromised, please inform us at support@net7.be, we'll revoke the corresponding key.
Do note that it is possible and allowed for multiple people to use the same OpenVPN credentials at the same time.
We log all the connections and activity for all of the VPN systems.
PPTP
PPTP is still easy to configure on Windows but is now unsupported on recent versions of MacOS.
That type of VPN is fast and efficient but often has issues running under strict firewalling rules and in the case of other PPTP connections being opened at the same type.
We can still provide you with a PPTP VPN access on demand.
Setting up the OpenVPN client
You'll find the OpenVPN setup instructions related to the platform you're using hereunder.
On Windows
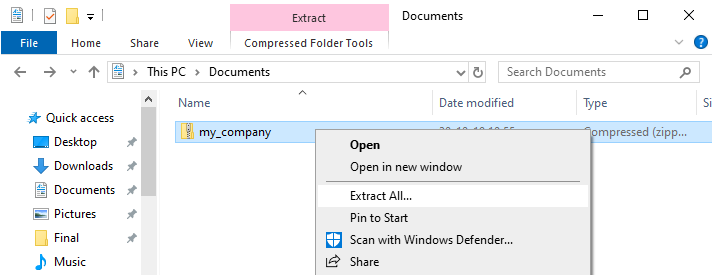
First, get your hands on the credentials zip file that was sent to you. Make sure to unzip its content somewhere safe on your filesystem (you should remove the zip file afterwards). You can unzip the file by just right clicking it and picking "Extract All..." from the menu:
Once that's done, let's download the OpenVPN client installer for Windows. We recommend at least version 3 (which is still in beta as of today but works fine).
You can find it directly on the OpenVPN website download section for the latest version, or stored in our premises at the following URL:
https://worm.net7.be/openvpn/openvpn-connect-v3-windows.msi
Once the software is installed, run it, and hit the "+" button in the bottom right, or find the "Import profile" functionality.
Select the "Import from file" tab as shown here:
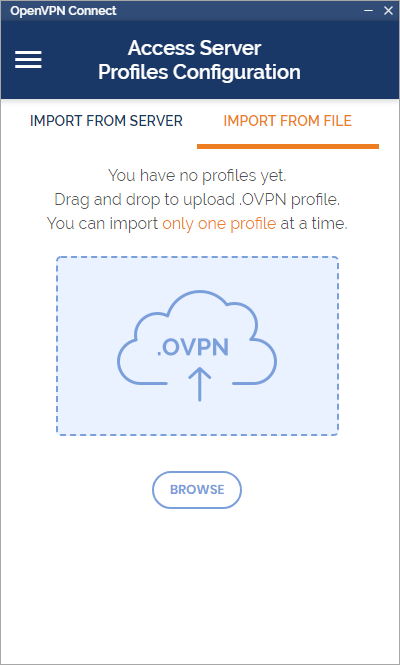
Click "Browse", get into the directory where you previously unzipped the access files, and select the .ovpn file.
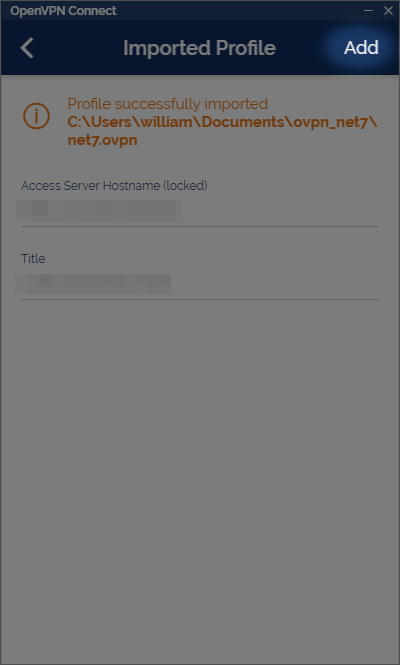
You should get a new view in which you have to click the "Add" button in the header, as highlighted here:
You can now connect the VPN using the toggle button in the main view:

To test your VPN connection you should ping the internal (VPN) IP address of your private server or service (e.g. 172.20.0.5) and check that it works.
On MacOS
First get your hands on the VPN credentials zip file that was sent to you and unzip it.
The client for MacOS that we recommend using is called Tunnelblick.
Download and install the .dmg from their download page. We tested using the stable version.
Once the installation is done you should now have a tunnel icon in the upper right corner of your desktop.
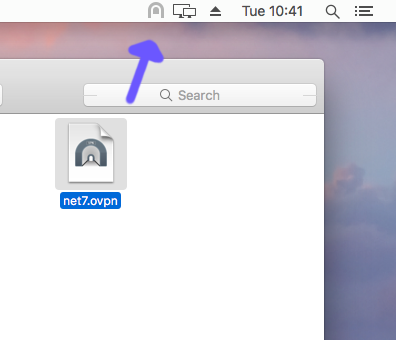
Open the location where you unzipped the access files in Finder, and drag and drop the .ovpn file to the tunnel icon, as shown here:
You should now be able to connect to the VPN by clicking the tunnel icon and hitting "Connect".
To test your VPN connection, open a terminal and ping the private VPN IP address of your private server or service (e.g. 172.20.0.5).
On Linux
The easiest way to setup the VPN on Linux is to use NetworkManager, which should support OpenVPN from the get go so you don't need to install anything on most modern desktop distributions.
We'll show the full setup process for a few different distributions hereunder.
Mint
First, make sure you have extracted the zip file with your VPN access credentials files somewhere in your home directory.
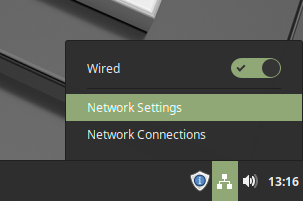
When using Cinnamon, you can click on the network icon in the taskbar and select "Network settings" as shown here:
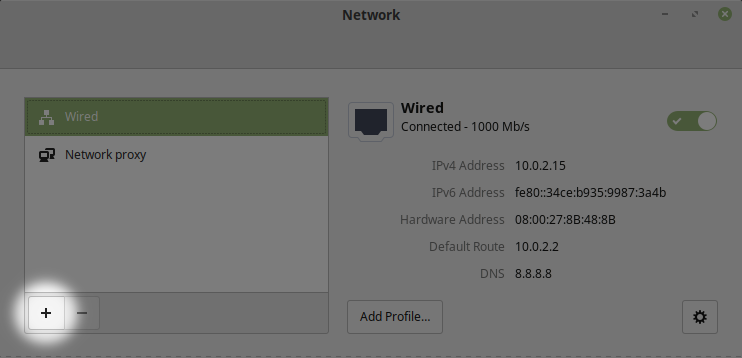
Hit the "+" icon on the following screen to create a new connection.
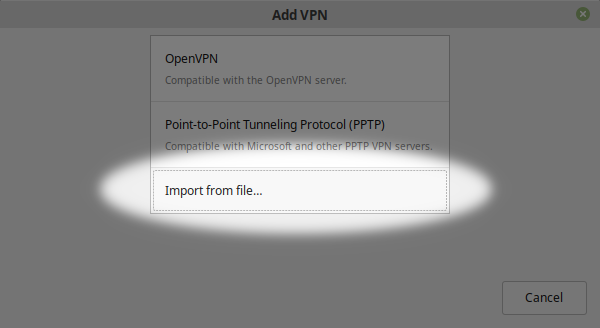
On the next screen, select "Import from file" and select the .ovpn file from the archive we have extracted previously.
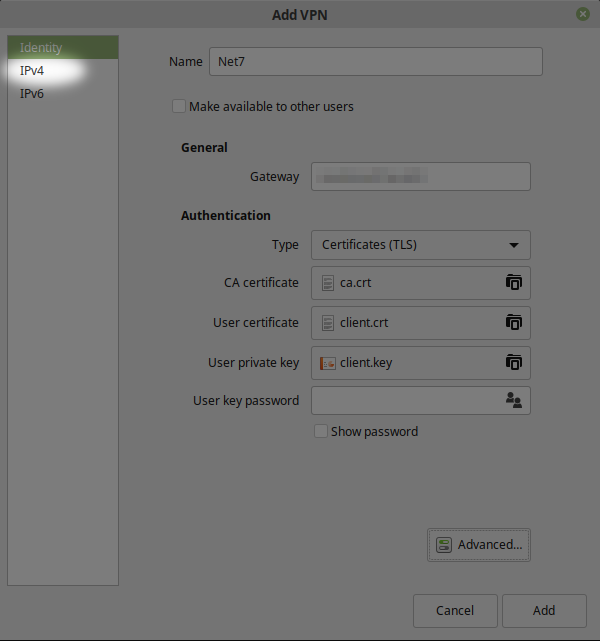
The "Add VPN" window should open. You can change the name of the connection here to be "Net7".
You should then click on the "IPv4" settings tab as shown here:
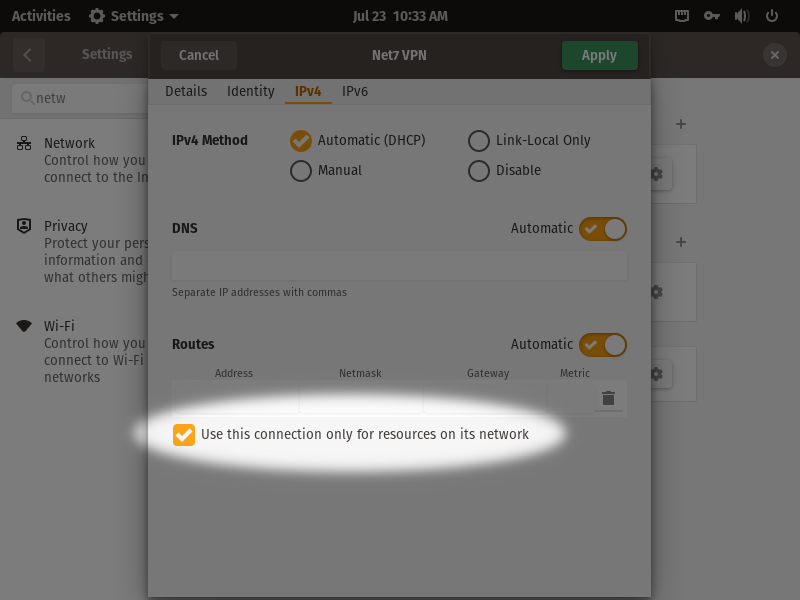
Important: In the IPv4 settings view, make sure to check the option "Use this connection only for resources on its network":

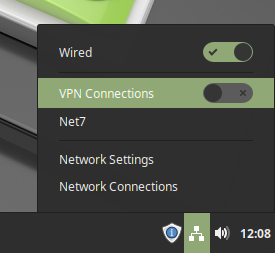
You can now connect to the VPN by clicking on the network icon in the notification bar and toggling the connection:
To test your VPN connection, open a terminal and ping the private VPN IP address of your private server or service (e.g. 172.20.0.5).
PopOS
First, make sure you have extracted the zip file with your VPN access credentials files somewhere in your home directory.
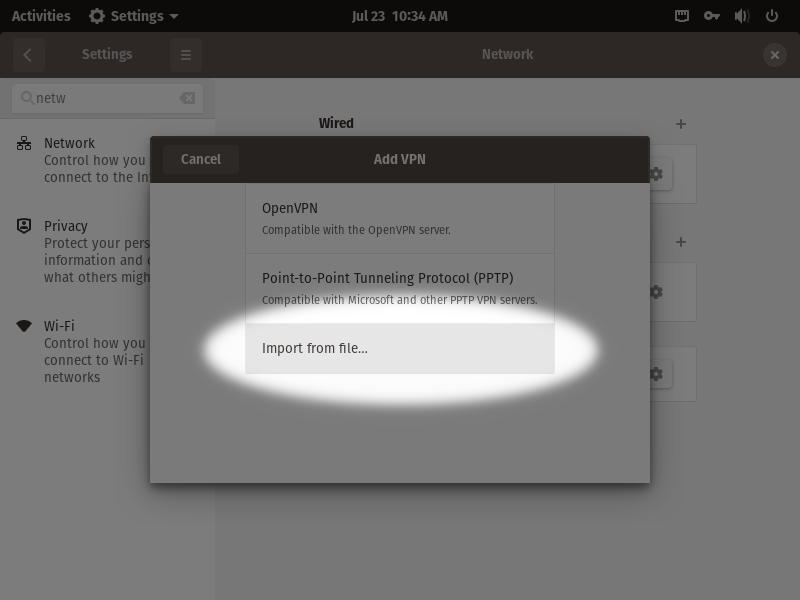
Next, in the network settings page there is a section to create a new VPN connection. It will open a window where you have to pick "Import from file" as shown here:
Browse to where you have extracted your VPN credentials and select the .ovpn file.
A window with the VPN settings should open with four tabs on top. Click on "IPv4" and then check the option "Use this connection only for resources on its network" as shown below:
To test your VPN connection, open a terminal and ping the private VPN IP address of your private server or service (e.g. 172.20.0.5).
On Android
To configure OpenVPN on any Android device, you first have to put your VPN access credentials files on the device.
The safest way is to connect your device to a computer using a USB connection, enable file transfer mode, and copy the OpenVPN files somewhere on the Android filesystem.
Next, on the device itself, you need to install the OpenVPN Connect client from the Play store.
Once that's done, open up the app and it should look similar to the Windows one (version 3+). Just tap the "+" button and select your .ovpn file. The rest should be straightforward.
On IOS devices
We unfortunately don't have a direct way to test OpenVPN on an IOS device.
The main difficulty would likely be to find a way to import the OpenVPN files onto the device filesystem.
Setting up the PPTP client
We're only showing the procedure for Windows.
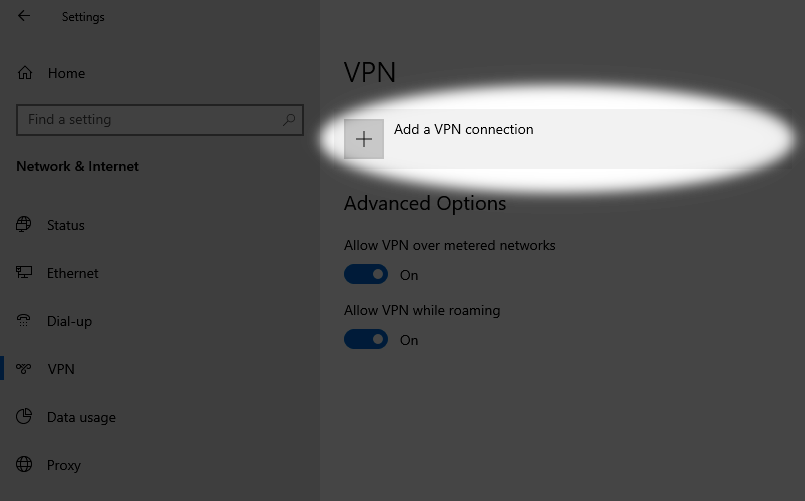
Open the Network and Sharing Center. On Windows 10, there is a "VPN" subsection you can access from the menu on the left. From there, you can add a new VPN connection:
Windows will then ask you for the VPN configuration info:
- Connection name: you can use "Net7"
- Server name or address: Enter the server name you were provided with
- VPN Type: PPTP
- Type of sign-in info: User name and password
- User name: Enter the username you were provided with
- Password: Enter the password you were provided with
Example:
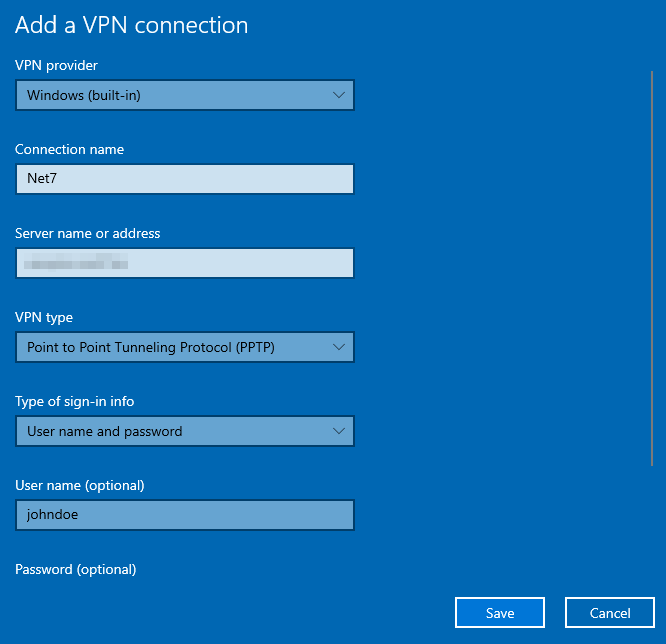
Click OK to validate the creation of the connection. Don't try connecting yet, we need an extra step.
Open the Network and Sharing Center anew but this time pick "Ethernet" in the menu on the right, then "Change adapter options":
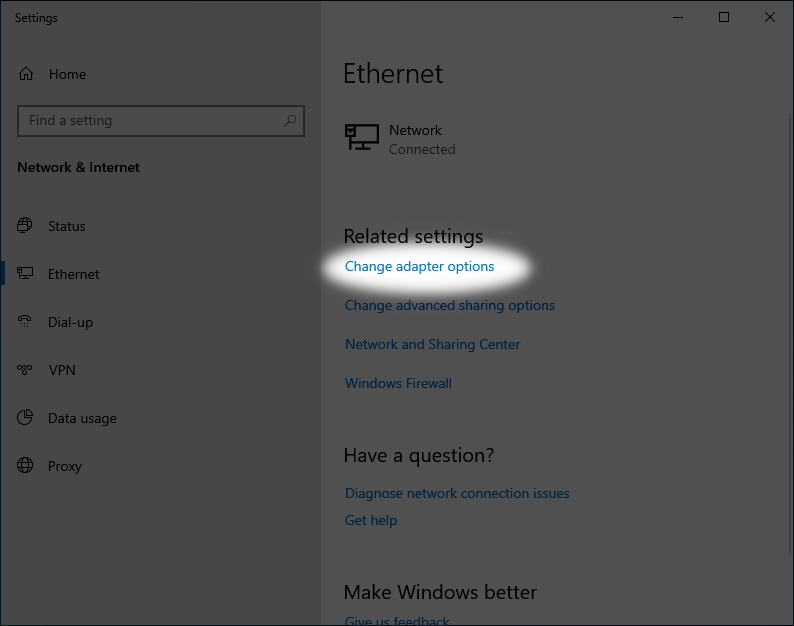
From there you need to right click the VPN connection we just created and click "Properties".
In Networking, double click IPv4 then "Advanced...", uncheck "Use default gateway on remote network" as shown here (click the image for a bigger version):
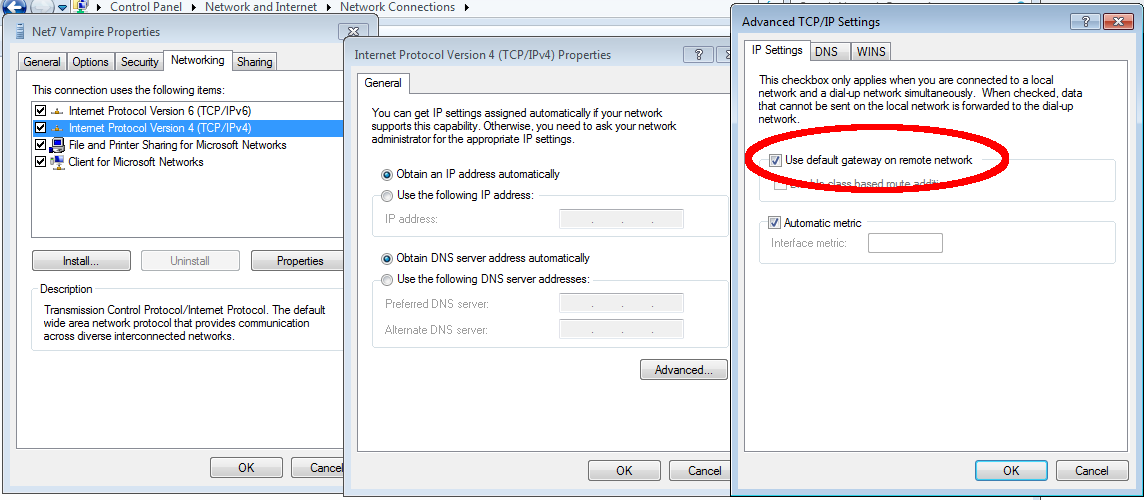
Confirm the changes and the connection should be ready. Just right click and connect to test it.