Introduction
Our previous article about Kubernetes bare-metal deployment is probably the most viewed content on the blog.
With more experience and kubeadm becoming mature (it was still considered exprimental at the time of the previous article) we thought it would be a good idea to provide a refresh of the old article (albeit with less general info and explanations) with the quickest way to create your own Kubernetes cluster on hardware or virtual machines you happen to own.
Software versions
- OS: Debian 10 x64
- Docker: 19.03
- Kubernetes: 1.18
We're going to use kubeadm to setup a single master Kubernetes cluster.
As a general rule for this article, you may need to prepend "sudo" to administrative commands like apt-get.
Preparing the nodes
You need at least 3 nodes, knowing that by default the master node will be configured as to never schedule any non-system containers to run on it.
This is effectively good practice as it's possible to saturate the system memory on a node which may cause a complete crash of said node.
The services running on the master also tend to use a significant amount of CPU time.
However, if you're short on hardware resources you may want to run containers on the master as well. Se the following link for more info on that.
As for resources per node, you will want at least 2 cores and 6GB of RAM.
Goes without saying but the nodes have to be able to see each other on the same internal network.
Installing Docker
To install Docker on Debian the easiest is to follow the official instructions here.
Version 19.03 is marked as compatible with both Kubernetes 1.17 and 1.18 so you can safely install that version.
Once Docker is installed, it's a good idea to mark it so we can't accidentally update it:
apt-mark hold docker-ce
apt-mark hold docker-ce-cli
apt-mark hold containerd.io
They also recommend adding extra config for the Docker daemon. Create the file /etc/docker/daemon.json with the following content:
{
  "exec-opts": ["native.cgroupdriver=systemd"],
  "log-driver": "json-file",
  "log-opts": {
    "max-size": "100m"
  },
  "storage-driver": "overlay2"
}
Then create the following directory:
mkdir -p /etc/systemd/system/docker.service.dReboot the node then try a gratuitous docker ps to make sure the Docker daemon is running.
Remove the swap
This step is a copy from the earlier note.
If your node candidate has a swap space, it needs to be removed.
Edit /etc/fstab, find the line for the swap entry and comment it out.
You could now either reboot or use the command to immediately remove current swap spaces:
swapoff -a
Network setup
We're going to need the br_netfilter kernel module so you'll have to add a line with br_netfilter in /etc/modules, and either reboot or use:
modprobe br_netfilter
Now open /etc/sysctl.conf, we're going to need these two lines:
net.ipv4.ip_forward=1
net.bridge.bridge-nf-call-iptables=1
Either reboot or apply the sysctl change:
sysctl -p /etc/sysctl.conf
IP forwarding and bridging should now be enabled.
The following is more specific to Debian, because of the network plugin we're going to use, it's important that the legacy iptables utility is the one being registered:
apt-get install -y iptables arptables ebtables
update-alternatives --set iptables /usr/sbin/iptables-legacy
update-alternatives --set ip6tables /usr/sbin/ip6tables-legacy
update-alternatives --set arptables /usr/sbin/arptables-legacy
update-alternatives --set ebtables /usr/sbin/ebtables-legacy
If you plan on using NFS storage one way or another, it's a good idea to make sure your node also has the NFS client:
apt-get update && apt-get install nfs-commonInstalling kubeadm
Run the following commands to setup the Google package repository and install the latest versions available:
apt-get update && apt-get install -y apt-transport-https curl
curl -s https://packages.cloud.google.com/apt/doc/apt-key.gpg | apt-key add -
cat <<EOF | sudo tee /etc/apt/sources.list.d/kubernetes.list
deb https://apt.kubernetes.io/ kubernetes-xenial main
EOF
apt-get update
apt-get install -y kubelet kubeadm kubectl
apt-mark hold kubelet kubeadm kubectl
These packages need to be present on all nodes.
Creating the master node
First thing is to decide which CIDR network to use for pod networking.
This time around we're using Calico as the network plugin, their default pod network is 192.168.0.0/16.
In case you already use that network or a subnet of it locally, you will want to use another one for the Kubernetes pods or it could cause issues.
For example, let's say I want to use 10.177.0.0/16 as my pod network.
We have to pre-download the Calico deployment file:
wget https://docs.projectcalico.org/v3.11/manifests/calico.yamlWith your editor of choice, change the declared CIDR accordingly. At the time of writing there is only one spot to change:
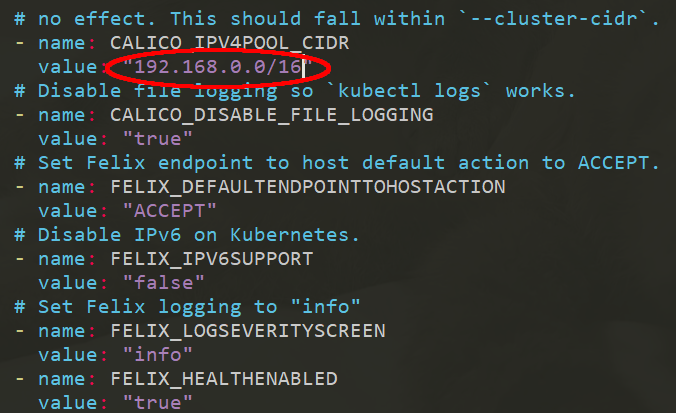
You can now initialize the master node by running the following command on it:
kubeadm init --apiserver-advertise-address=<API_SERVER_ADDRESS> --pod-network-cidr=<POD_CIDR>Where <API_SERVER_ADDRESS> will be the IP address registered for the admin user to contact the cluster, as well as the one used by worker nodes to join your cluster.
The API server will listen on every IP addresses present on the master node by default, but the specified <API_SERVER_ADDRESS> will be the one used by all the nodes so make sure it's reachable from all of your worker nodes.
The <POD_CIDR> should be the pod network you decided on using and is already modified in the calico.yaml file we downloaded earlier.
The default <POD_CIDR> for Calico is 192.168.0.0/16, in which case you don't need to edit the yaml file.
If kubeadm runs without errors, it should print you a join command with a token that should look like this:
kubeadm join <API_SERVER_IP>:6443 --token <TOKEN> \
  --discovery-token-ca-cert-hash sha256:<DISCOVERY_TOKEN>
Before running that command on the worker nodes, we need to install the network plugin.
Setup kubectl to be used locally as cluster administrator:
mkdir -p $HOME/.kube
cp -i /etc/kubernetes/admin.conf $HOME/.kube/config
chown $(id -u):$(id -g) $HOME/.kube/config
Then apply the yaml file we downloaded earlier (and possible modified to have another pod network):
kubectl apply -f calico.yamlInstalling Calico might take some time. You can check that it's working by looking for the coredns containers:
kubectl get pods --all-namespaces$ kubectl get pods --all-namespaces | grep core
kube-system coredns-6955765f44-4x2mc 1/1 Running 1 1d
kube-system coredns-6955765f44-cw9x6 1/1 Running 1 1d
Adding the nodes
Just run the join command that was given out by kubeadm on the master node.
That's all. Just make sure to wait for the network plugin to be completely up before joining the nodes.
Installing Helm
Helm is very useful to Kubernetes as a sort of package manager and it's a good idea to install it right away on the master node.
There is a handy script making the installation easy:
curl -fsSL -o get_helm.sh https://raw.githubusercontent.com/helm/helm/master/scripts/get-helm-3
chmod 700 get_helm.sh
./get_helm.sh
rm get_helm.sh
Once that's done we should add least add the official stable repository like so:
helm repo add stable https://kubernetes-charts.storage.googleapis.com/Bonus: Installing nginx-ingress
We wrote an entire article on the subject of Kubernetes Ingress with Nginx and automatic SSL configuration using cert-manager and Letsencrypt.
The end goal was to support a bare-metal setup where you'd have a dedicated load-balancer in front of the Kubernetes cluster (which uses a private network).
To achieve said goal we opened NodePort services on ports 31080 and 31443 for nginx-ingress and enabled the proxy protocol so that the front load balancer could pass on every info needed for nginx-ingress to properly log all incoming HTTP requests.
Turns out, with Helm, such an install is a one liner:
helm install --set controller.service.type=NodePort \
  --set controller.service.nodePorts.http=31080 \
  --set controller.service.nodePorts.https=31443 \
  --set-string controller.config.use-proxy-protocol=true \
  nginx-ingress stable/nginx-ingress
You still need to setup a proxy up front (we used HAProxy in the dedicated article) and deploy cert-manager for SSL but Helm makes this deployment extremely easy.