Introduction
We previously wrote a gentle introduction to tmux as a great tool to add to your Linux command line arsenal.
Some things were left out as "advanced" topics (a matter of opinion, obviously) and one of these is copy pasting.
When using a graphical environment (like Windows, MacOS, any of the Linux graphical interfaces) you get the OS text clipboard bound one way or another to your graphical console emulator of choice.
However, not only is it possible that you don't have a graphical session and thus can't use that clipboard but you may also find that it can't be made aware of screen splitting.
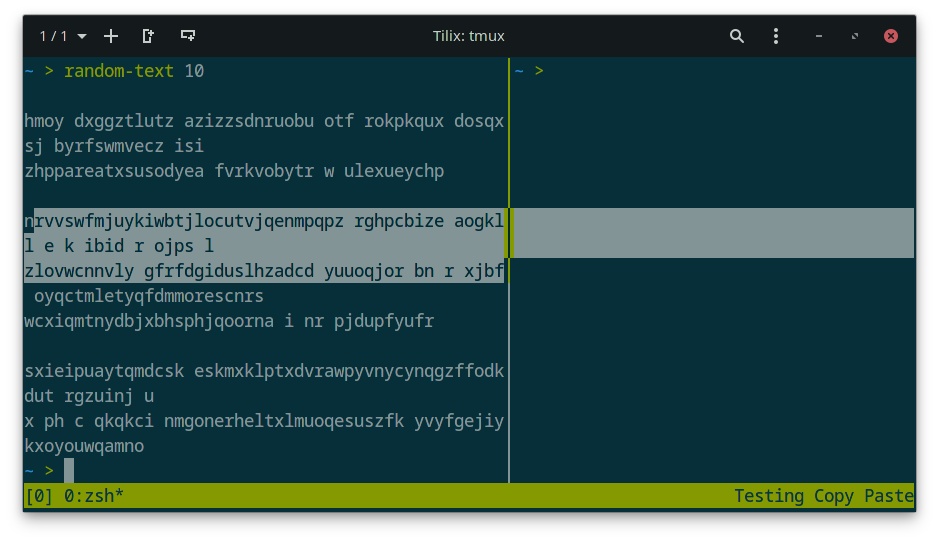
For instance, trying to copy text that wraps several lines on the left panel in the screenshot below will either have your cursor go all the way to the other pane, which will copy the data here and the middle separator (which are actually "|" characters) or it'll copy line feeds that do not exist if you try to limit the width of what you copy on the left pane.
Copy pasting as offered by a terminal emulator also tends to differ for each terminal emulator mostly because the expected copy paste hotkeys, namely Ctrl+C and Ctrl+V, have a historical meaning for teletype machines, the hardware being emulated by terminal emulators.
If you're a little familiar with command line in general, you have probably used Ctrl+C to send an interrupt signal, something with no relation to copy pasting whatsoever.
Extra-configuration
The hotkey for pasting the content of the tmux buffer normally is Prefix+] and that's very awkward to do on a Belgian azerty keyboard so I like to change it to Prefix+o.
To do just that you can add the following line to your .tmux.conf file (change the hotkey if you'd like another one):
bind-key o paste-bufferI'm not using "p" because Prefix+p is already "previous window" in the default scheme and I don't want to alter it too much.
Some people like to bind "P" as in uppercase P but I find it easier to hit the letter right before p than add an extra shift into it not to mention some terminal emulators for Windows already have something bound to Shift+P that will take precedence.
My personal minimal tmux config can be limited to just the following:
set -g mouse on
setw -g mode-keys vi
bind-key -n M-c copy-mode
bind-key C-b last-window
set -g history-limit 10000
bind-key C-x setw synchronize-panes
bind-key o paste-buffer
Short word on panel "zooming"
There's an easy way to solve the issue with the terminal emulator not being aware of panels which is to zoom in the panel from which you want to copy content.
You'll be missing out on tmux features offered by the Copy mode and its own way of handling multiple paste buffers but it's way easier to get started this way.
Zooming is available when using panels and you just have to press Prefix+z. You'll know a panel is being zoomed in because a *Z is added to the window name at the bottom:

To zoom out, you can press Prefix+z again or use one of the panel switching hotkeys (e.g. Prefix+Arrow).
Switching windows doesn't automatically zoom out.
When zoomed into a panel, using the terminal emulator hotkeys will work as expected. For instance, Ctrl+Shift+c or Ctrl+Shift+v on Linux (sometimes it's Alt+C and Alt+V), right mouse clicks on Windows or Ctrl+C and Ctrl+V on the newer Windows Terminal app.
Using tmux's Copy mode
Copying text with tmux involves entering Copy mode first.
The normal hotkey to enter that mode is Prefix+[ but I remapped it to Alt+C (see our other article or the full minimal config posted above).
Our configuration also has "vi" mode enabled. That mode doesn't actually emulate vi copy pasting but it makes it so that j,k,l,m can be used for navigation, as well as some other navigation helpers from vi such as w to move to the next word.
Some people add more custom bindings to get something more aligned with vi when it comes to copy pasting but that's mostly up to you.
To copy text you have to start a selection at the current cursor position by hitting Spacebar and then move the cursor to create the selection.
The selection is copied as a tmux buffer after hitting Enter.
When Mouse mode is enabled, as is the case in our custom config, selecting with the mouse will also work and is completely aware of which panel you're in.
Releasing the mouse button will copy to a buffer and erase the selection by defaut. There are ways to override this behavior but this is out of scope for the current article.
Pasting
Once the text has been copied you will want to exit Copy mode by hitting q, move to where you want to paste the text (possibly in another panel or window), and hit our previously remapped key for that: Prefix+o and that will paste the buffer.
tmux actually keeps the previous buffers and you can paste an older one by using Prefix+= and selecting what you want with the arrow key, then pressing Enter to confirm or q to cancel.
Extra: also copy to system clipboard
The tmux buffers are independant from the system clipboards. I'm making it plural because Unix based systems have, to put it simply, at least two different clipboards.
One of them is related to pressing the middle mouse button. It exists for historical reasons and emulates how Unix does copy pasting.
Copying data into that clipboard is done by selecting text then clicking on said text once and that's it.
tmux copy pasting doesn't interact with that clipboard at all either and that's probably fine for 99% of users.
In effect, every platform has a slightly different clipboard and asking tmux to also copy its buffers to the system clipboard will be different depending on your OS.
There's a tmux plugin called tmux-yank that configures the clipboard linking for you automatically and intelligently in that it's supposed to be aware of your platform and adapt how it works adequately.
However, tmux plugins are out of scope as we'd like to be able to just add one or two lines to our config file and be done with it.
The utility we'll rely on should be present on any Linux distribution with a graphical interface: xclip.
By default it copies to the "middle mouse button clipbloard" (actually called "primary") and we want the XServer clipboard so we have to select it as an argument. Here's how we'd do it on Linux:
bind-key -T copy-mode-vi Enter send-keys -X copy-pipe-and-cancel 'xclip -sel clip -i'
bind-key -T copy-mode-vi MouseDragEnd1Pane send-keys -X copy-pipe-and-cancel 'xclip -sel clip -i'
Where the first line binds Enter to copy the buffer and also pipe it to the provided xclip command.
The second line is necessary for this behavior to also apply to releasing the mouse selection using tmux's Mouse mode as mentioned before.
On Windows running WSL, you'd use these two lines:
bind-key -T copy-mode-vi Enter send-keys -X copy-pipe-and-cancel 'clip.exe'
bind-key -T copy-mode-vi MouseDragEnd1Pane send-keys -X copy-pipe-and-cancel 'clip.exe'
For MacOS you'd have to use wl-copy. Since I don't have a Mac around I can't test it.
Conclusion
We hope our simple config can help you be more efficient when editing files on servers or your own machine.
Evidently, a lot more can be customized when it comes to tmux and copy pasting on Linux can be weird for various reasons. For instance we haven't talked about the copy paste buffers of command line text editors like nano or vi, as they have their own copy paste system.