Introduction
In the early days of doing server administration on Windows we were mostly using the Putty SSH client, either with a ton of profiles, or within some third party program like mRemote.
None of these made it simple to export and move your remote hosts config around.
At some point, Microsoft added the GNU SSH client to their official Windows packages, we briefly touched on the subject in our article about WSL and the new Windows terminal — We'll be using the latter in our screenshots.
We'll present what we think is a nice way to neatly organize your server accesses and switch to key pair authentication for better security.
Installing the SSH client
It just sits in the Windows optional features.
On my test system it was already installed:

The feature installs multiple executables aside from ssh.exe, including scp, the ssh-agent service and more.
If you had to install it, you may need to restart your user session for it to be immediately available in command line sessions.
We could already log into our server using something like:
ssh admin@172.20.1.117Where admin is the administrative user name you were given with the server access information, and 172.20.1.117 here is the local IP address of your server on the Net7 VPN (which is required to be connected).
For other servers on different providers you may have to use a public IP address or domain name.
Even Windows machines could technically be setup to offer SSH sessions but that is out of scope for this article.
The SSH client will ask you to confirm the host public key when connecting for the first time. That key is unique to that SSH server and is used to make sure you're connecting to the right server.
The client will cache the key and alert you if a server at the same IP address suddenly presents a different host key.
Key pair authentication
It's possible to use pairs of keys instead of passwords to connect to SSH servers.
These key pairs are composed of a public key and a private key which are linked by mathematical properties but in such a way that it's extremely hard to derive the private key from the public key.
Which comes in handy because the public key is what you can copy and share around, whereas the private key should be safely kept only on trusted storage and is usually (will be the case if you follow this article) encrypted by its own password.
As far as SSH is concerned, servers can have a list of public keys that are allowed to connect.
The SSH client has to demonstrate being the real owner of that public key by performing signatures that are only doable with the private key from that specific key pair.
The rest of the SSH session will be encrypted using a negociated session key so that, in case your private key is compromised, past communications with the server still can't be decrypted.
In short, your key pair is used to identify or authenticate you very precisely and safely, possibly on multiple services.
Key pairs (including the encrypted private key — in case it leaks) are much harder to break than password hashes and thus are considered safer than passwords. We also tend to not write private keys down somewhere.
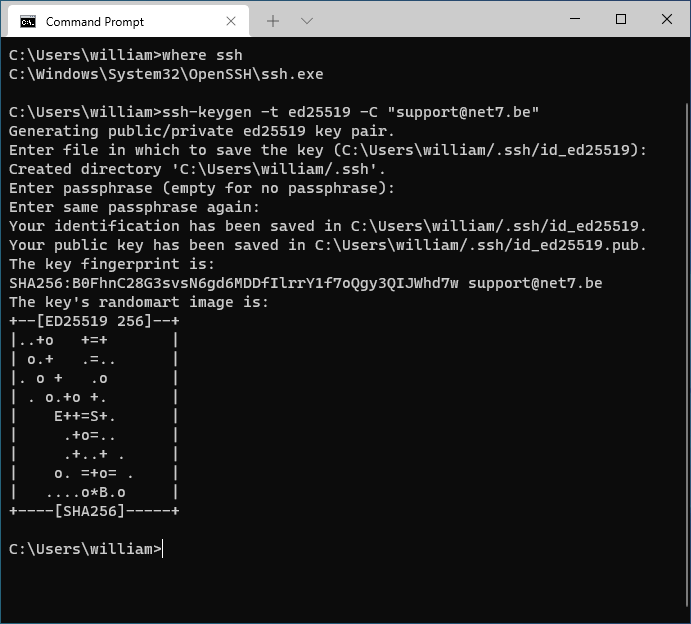
Generating your key pair
To generate your key pair, open a terminal and run the following command:
ssh-keygen -t ed25519 -C "<YOUR_EMAIL_ADDRESS>"Where you should fill in your email address. In case you'd want to use the key pair for Github later on, make sure you use the email address registered to your Github account (same goes for Gitlab and others).
You will be asked for a passphrase to encrypt the private key with. You should always provide one. A possible exception to this rule is when you need two servers to access each other and you're certain of the security of the whole thing.
Having an encrypted system and user volume and adequate session security (auto-locking etc.) could also justify not using a passphrase in some cases.
You should never move your private key around over the Internet and strive to be extremely safe when doing so. An encrypted private key adds an extra layer of security in case your private key does leak around somewhere.
In case you need to connect to older servers, you might need a RSA key pair, which is an older algorithm (it's still safe provided you use large key sizes):
ssh-keygen -t rsa -b 4096 -C "<YOUR_EMAIL_ADDRESS>"You should now have a .ssh directory in your user directory (C:\Users\<YOUR_NAME>) with the following files:
- id_ed25519 — This is your private key; On Linux systems it shouldn't be visible to other users (should have been created with the right permissions)
- id_ed25519.pub — This is your public key. You can copy it around safely; When you need to provide a key to any service or copy a key to any server, it's always the public key
Creating the config file (list of SSH hosts)
Open a command line and make sure your current directory is your user directory (c:\Users\<YOUR_USER>).
You need to create a new file in .ssh called config.
Here's how to do it with notepad but any editor should do:
notepad .ssh\configIn case the file doesn't exist, notepad should ask you if you want to create it.
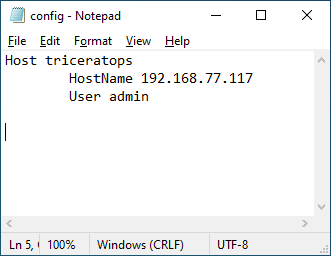
You can now add your SSH hosts in there following a specific format:
Host <HOST_FRIENDLY_NAME>
  HostName <IP_ADDRESS_OR_DOMAIN_NAME>
  User <REMOTE_USERNAME>
Let's say our server is called triceratops and sits on VPN IP address 192.168.77.117, and your user on the server is just admin, this is the entry we'd use:
Host triceratops
  HostName 192.168.77.117
  User admin
As depicted here in notepad:
We're free to add more of these Host sections for any SSH host you'd want to connect to.
There are a lot more options you can set per host in the config file. Most of them described here.
We won't list them here per se but that would be how you set a host to be on a port that isn't 22, force using a different key pair, command to run on server upon connection (could be tmux), ...
With your config file in place, you should be able to use the host friendly name (triceratops in our example) ssh and scp commands. Connecting to the server is now as simple as:
ssh triceratopsWhich will ask you for your password because our server hasn't been configured to allow our key pair yet:
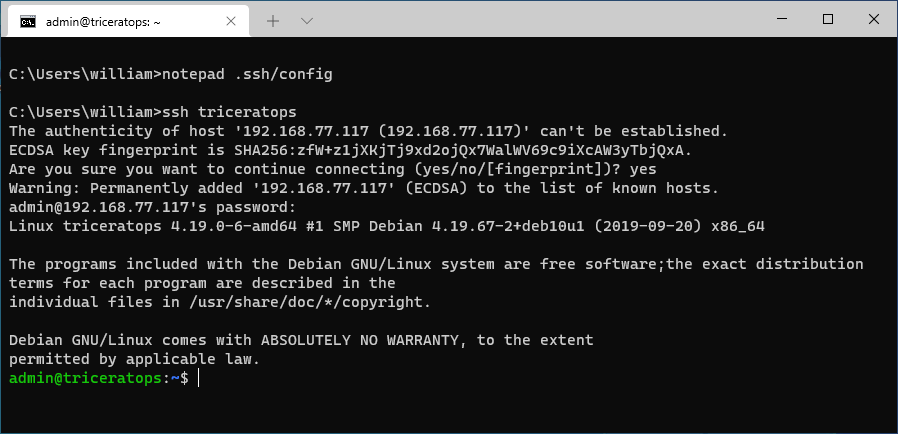
The config file is portable to any system that uses the classic SSH client and can be brought over to Linux, Mac, and Windows. It shouldn't contain any secret except for revealing IP address information for your services.
Authorizing our keys on the server
To log into a SSH server as a specific user, your public key has to be present in a special file in the ".ssh" directory your remote user — which has to be in their home directory, e.g.:
/home/<YOUR_USER>/.ssh/authorized_keysThe .ssh directory might not exist if you have never used the SSH client on that server.
We devised some command line magic to create the directory when it's not present and put your public key in authorized_keys (will append your key to the file in case you already have other keys in there).
The following command assumes your session current directory is your Windows user directory (c:\Users\<YOUR_USER>).
ssh triceratops "mkdir -p ~/.ssh; tee -a ~/.ssh/authorized_keys" < .ssh\id_ed25519.pubMake sure you're referencing the .pub file and NOT the private key.
When we try to connect to triceratops afterwards, it's still asking for a password, but looking more closely, that's not the server password, it's they private key passphrase.
In practice it looks like nothing has changed but that's not true, not only can you reuse your key pair for all of your servers and many services (including Github) and thus use a single master password to access all of these but we also benefit from the increased security of the key pair authentication scheme.
Optional: Store the private key in the Windows session
It's possible to make it so that you don't have to enter your private key passphrase to use the key pair.
We need a Windows service called the "OpenSSH Authentication Service" or sometimes shortened as "ssh-agent". It should be disabled by default.
To open the Services console, you can press the Windows Key + R and then type services.msc, press enter to open the services console.
Look for the "OpenSSH Authentication Service" in the list, right click and open properties.
From there, set "Startup type" to automatic if you want that service to start with Windows from now on, and then start the service (use the "Start" button or right click the service and use start from here).
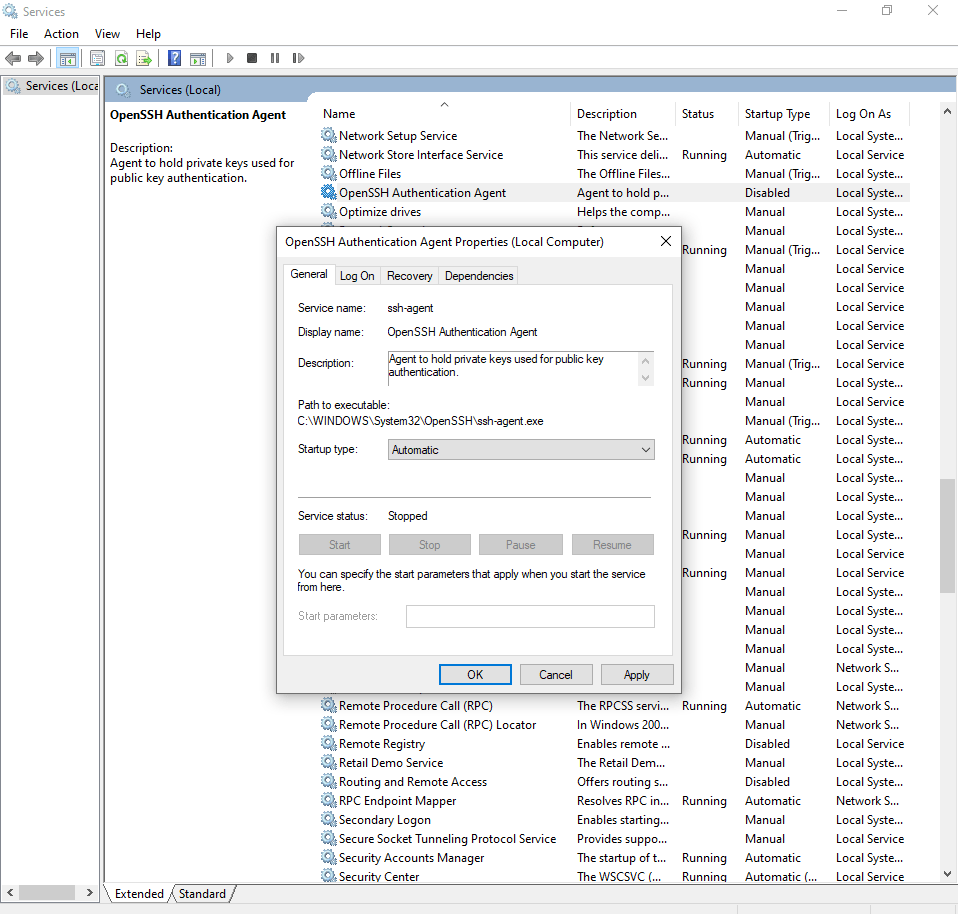
On some Windows installations, you may have to manually run the services console as administrator or it may not allow you to start the service.
You can now add your private key to the agent using a command prompt:
ssh-add .ssh\id_ed25519
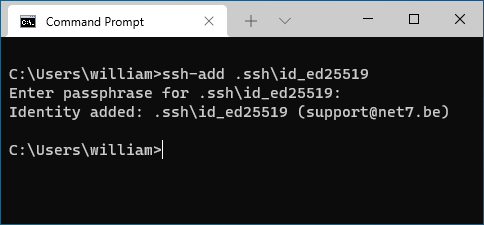
You should now be able to use the key pair with no password prompt.
Ideally you'd want to manually delete the private key, as it's now stored in the SSH Agent service and encrypted in such a way that you can't get it back.
This is both good and bad as it means moving your private key to another computer is now impossible — You'd have to create a new key pair. As such it's not a bad idea to backup your private key, maybe by storing it on a special USB stick (some USB sticks are even meant to store sensitive data).
To delete your private key from the command prompt, when inside of your user directory, you can use:
del .ssh\id_ed25519Keep in mind that you should now be extra careful with open sessions on your Windows machines, because anyone with access to your computer and keyboard could connect to your servers with no password when a session is open.
We suggest having a strong Windows password and locking your screen automatically after a few minutes. You can also lock it manually using Windows Key + L.
Copying files with scp
You can also use your keypair and config file to easily copy files to your servers using the scp command.
NB: scp uses a "normal" SSH session for file copy and is different from SFTP, even though the OpenSSH Server can do both of these.
Copying a single file to remote directory /var/www/html:
scp some_file.html triceratops:/var/www/html/Copying a directory to your home folder:
scp -r my_project triceratops:/home/admin/You can also use scp to bring files from the server over to your client machine. For instance, to bring a log file back to the current directory on your client machine:
scp triceratops:/var/log/auth.log .